The Dew Review – Taking a Look at the Latest Release of Aspose.Email

Introduction

I have been spending some time working with the latest Apose.Email for .NET. It has been twelve or thirteen years since I have written any email related code. Back in the early 2000s, I did a little bit of work with Visual Basic and the Outlook Collaboration Data Objects (CDO). We have come a long way since that time. Email in the cloud is now becoming the norm with Gmail and Office 365.

There’s still plenty of need for local and Exchange based email processing in business applications as well. I will get to one possible scenario in my own application below.

Latest Aspose.Email Release

The Aspose.Email library supports just about any email related activity imaginable. Here is just a handful of scenarios developers can code into their own applications with Aspose.Email:

Generate emails and send via SMTP
  • Embed objects in message body – Send emails with embedded images or documents.
  • Attach files – Attach files to an email as a user would from their email client.
  • Mail merge – Powerful support for mail merge and mass emailing.
  • iCalendar support – Read and manipulate calendar events via the iCalendar standard.
  • Receive POP3 mail
    • Work with IMAP mail sources
    • Authentication
    • Work with messages and folders
    • SSL support (for POP3 and SMTP)
    Message Files
    • EML/MSG/MHT formats – All common mail message formats are supported.
    • Work with files or streams – Open messages from disk or network streams.
    • Manipulate PST files – Create, read and manipulate Outlook PST files and their contents.
    MS Exchange Server
    • WebDav and Exchange Web Services support
    • Unified Messaging operations
    • Send emails and Meeting Invites
    Advanced support for recurrence
    • Easily and reliably calculate event recurrence
    • Suppoprt for iCalendar (RFC 2445)

    Detailed developer documentation for all of the Aspose.Email features is available online here.

    So, whether your application needs to work with Exchange, Outlook files, POP3/SMTP, or talk to Gmail via IMAP, Aspose.Email has APIs to help with each situation. There are also sample apps for each feature exposed in Aspose.Email to get developers started off on the right track.

    An IMAP Console Application

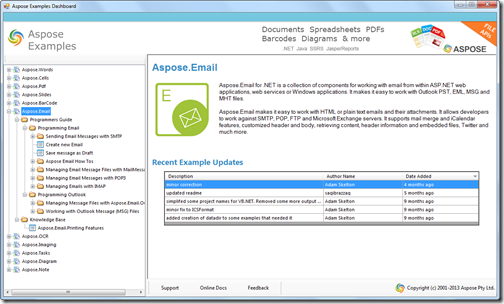
    There are dozens of sample applications installed along with Apose.Email. To get started, launch the Aspose Examples Dashboard:

    asposeexamples

    The example apps are grouped by feature set. Developers can view the code in the Sample Browser, launch the solution in C# or VB, or run the example app right from the Browser application.

    I decided to take a closer look at one of the IMAP samples. The one I chose was “Fetch Messages from IMAP Server and Save to Disk”, which does exacly what the name implies. It is a console application that connects to a Gmail account via IMAP, selects the Inbox folder and loops through all of the messages, saving each one to a local folder in the “.eml” format. Here is the complete code implementation for the app after a couple of ReSharper refactorings.

    public static void Main(string[] args)
    {
        // The path to the documents directory.
        string dataDir = Path.GetFullPath("../../../Data/");
        Directory.CreateDirectory(dataDir);
    
        //Create an instance of the ImapClient class
        var client = new ImapClient
                     {
                         Host = "imap.gmail.com",
                         Username = "asposetest123@gmail.com",
                         Password = "F123456f",
                         Port = 993,
                         SecurityMode = ImapSslSecurityMode.Implicit,
                         EnableSsl = true
                     };
    
        try
        {
            client.Connect();
           
            //Log in to the remote server.
            client.Login();
    
            // Select the inbox folder
            client.SelectFolder(ImapFolderInfo.InBox);
    
            // Get the message info collection
            ImapMessageInfoCollection list = client.ListMessages();
    
            // Download each message
            for (int i = 0; i < list.Count; i++)
            {
                //Save the EML file locally
                client.SaveMessage(list[i].UniqueId, dataDir + list[i].UniqueId + ".eml");
            }
    
            //Disconnect to the remote IMAP server
            client.Disconnect();
    
            System.Console.WriteLine("Disconnected from the IMAP server");
        }
        catch (System.Exception ex)
        {
            System.Console.Write(ex.ToString());
        }
    }
    

    It is simple and intuitive to use.

    The PST Archive Utility

    I didn’t have the time to write my own applications that use every aspect of the library, so I decided to take one set of features and focus there. For years, I have been meaning to organize my work-related PST files into yearly archives. In fact, I have one PST that covers nearly seven years of email. It is nearly 6gb in size and contains who knows how many thousands of items.

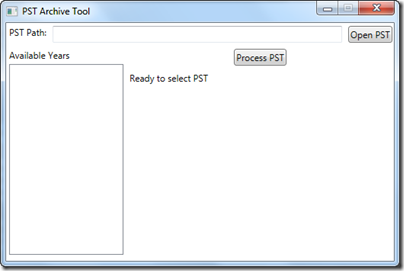
    I built a small utility that will read a selected PST file, iterate through all of its folders and move all items for the specified year into a new PST with the year prepended to the PST’s file name, mirroring the folder structure of the original PST. I decided to build the utility as a WPF application, but this could function nicely as a command line utility also.

    pst1

    Using the utility is rather straightforward, simply:

    1. Enter the full path to the PST to be read.
    2. Click ‘Open PST’.
    3. The available years will display. Select a year.
    4. Click ‘Process PST’.
    5. When complete, the status message will update to “New PST Created for Year xxxx”.

    The code to display the available years iterates through the folders and items, collecting the unique years into a List<int>. It then sorts them before setting the property in the ViewModel to which the Available Years ListBox is bound.

    /// <summary>
    /// Gets all the years of items in a PST file.
    /// </summary>
    private void GetPstYears()
    {
        if (String.IsNullOrWhiteSpace(PstPath) || !File.Exists(PstPath)) return;
    
        using (PersonalStorage mainPst = PersonalStorage.FromFile(PstPath, true))
        {
            CurrentStatus = "Processing Years...";
    
            List<int> years = GetAvailableYears(mainPst.RootFolder);
            years.Sort();
            Years.Clear();
    
            foreach (int year in years)
            {
                Years.Add(year);
            }
    
            CurrentStatus = "PST Ready";
        }
    }
    
    /// <summary>
    /// Gets the available years in a specified Outlook folder.
    /// </summary>
    /// <param name="folder">The folder.</param>
    /// <returns>A list of years.</returns>
    private List<int> GetAvailableYears(FolderInfo folder)
    {
        var years = new List<int>();
    
        foreach (MapiMessage message in
                    folder.EnumerateMapiMessages().Where(message => !years.Contains(message.DeliveryTime.Year)))
        {
            years.Add(message.DeliveryTime.Year);
        }
    
        foreach (int subYear in from folderInfo in folder.EnumerateFolders()
            where folderInfo.HasSubFolders
            select GetAvailableYears(folderInfo)
            into subYears
            from subYear in subYears
            where !years.Contains(subYear)
            select subYear)
        {
            years.Add(subYear);
        }
    
        return years;
    }
    

    Similarly, the code to move the messages for the selected year to the new PST, iterates the folder structure to find any matching items.

    /// <summary>
    /// Process a PST by moving items from a selected year to a new PST
    /// while creating the same folder structure.
    /// </summary>
    private void ProcessPst()
    {
        if (SelectedYearIndex < 0 || String.IsNullOrWhiteSpace(PstPath) || !File.Exists(PstPath)) return;
    
        int year = Years[SelectedYearIndex];
    
        using (PersonalStorage mainPst = PersonalStorage.FromFile(PstPath, true))
        {
            string newFileName = PstPath.Insert(PstPath.LastIndexOf("\\", StringComparison.Ordinal) + 1, year.ToString(CultureInfo.InvariantCulture));
    
            using (PersonalStorage pstWithYear = PersonalStorage.Create(newFileName, FileFormatVersion.Unicode))
            {
                ProcessSubfolders(mainPst.RootFolder, pstWithYear.RootFolder, year);
            }
        }
    
        CurrentStatus = String.Format("New PST Created for Year {0}", Years[SelectedYearIndex]);
    }
    
    /// <summary>
    /// Processes the subfolders of a provided PST folder and adds items
    /// from the specified year to the new folder provided.
    /// </summary>
    /// <param name="folder">The source folder.</param>
    /// <param name="newParentFolder">The new folder.</param>
    /// <param name="year">The year of items to move.</param>
    private void ProcessSubfolders(FolderInfo folder, FolderInfo newParentFolder, int year)
    {
        foreach (FolderInfo folderInfo in folder.EnumerateFolders())
        {
            FolderInfo newFolder = newParentFolder.GetSubFolder(folderInfo.DisplayName) ??
                                   newParentFolder.AddSubFolder(folderInfo.DisplayName);
    
            if (folderInfo.HasSubFolders)
            {
                ProcessSubfolders(folderInfo, newFolder, year);
            }
    
            newFolder.AddMessages(folderInfo.EnumerateMapiMessages().Where(m => m.DeliveryTime.Year == year));
    
            if (newFolder.ContentCount == 0 && !newFolder.HasSubFolders && newFolder.DisplayName != "Deleted Items")
                newParentFolder.DeleteChildItem(newFolder.EntryId);
        }
    }
    

    You can see that all of the PST manipulation is very intuitive. Everything I needed to know, I was able to quickly learn from the documentation and the sample applications. It feels as if the classes are a part of the .NET Framework. It is a very well written API.

    You can download the complete source code for the project here.

    Summary

    If you are working on any projects involving email processing or access, Aspose.Email can definitely simplify the code required to get the job done. I will definitely keep these libraries in mind for future projects and you should too.

    Happy coding!

    del.icio.us Tags: ,,


    Disclosure of Material Connection: I received one or more of the products or services mentioned above for free in the hope that I would mention it on my blog. Regardless, I only recommend products or services I use personally and believe my readers will enjoy. I am disclosing this in accordance with the Federal Trade Commission’s 16 CFR, Part 255: “Guides Concerning the Use of Endorsements and Testimonials in Advertising.”
    The Dew Review – DevExpress WPF Subscription – 2013.1 Release

    Introduction

    I have been using the latest release (2013.1) of DevExpress’ WPF Subscription over the last several weeks on my new Ultrabook, and I have had a great time exploring the expansive collection of tools and controls included in the suite. I have only used a fraction of the available controls available in this release, but I have been very impressed with everything I have been able to test drive so far.

    What’s New

    DevExpress has been building WPF controls for a long time now, but I cannot remember the last release with so much new stuff included. Here’s a quick rundown of the new features in 2013.1:

    • Getting Started Tutorial (New – Online)
    • Data Grid (Enhanced)
    • Chart Control Wizard (New)
    • Map Control (Enhanced)
    • Property Grid (New)
    • Row Multi-Select in Grid Lookup Control (New)
    • Range Control Integration in Scheduler Control (New)
    • Design-Time Extensions (SmartTags in the Designer) (New)
    • Scaffolding Wizards (New)
    • WPF Data Source Wizard (New)
    • Instant Layout Assistant (VS2012 Only) (New)
    • Icon Library w/VS Integrated Image Picker (New)
    • Windows UI Style Controls (New)
    • Touch Enabled Theme (New)
    • Window Visual Effects (New)
    • Touch-Friendly Date Picker Control (New)
    • Touch-Friendly Range Control (New)
    • Visual Studio Template Gallery

    Quite a list, eh?

    I will focus this article on a few of the coolest (in my opinion) features: the Template Gallery, the Windows UI Style Controls, and the Touch-Enabled Theme.

    Template Gallery

    DevExpress now integrates their own Template Gallery into Visual Studio. Under the DevExpress menu, you will find an ‘All Platforms’ submenu containing ‘New Project’ and ‘New Item’ menu items.

    dx1

    Selecting either of these launches the Template Gallery. The project templates are divided into WPF Common, WPF Business Solutions, and WPF Windows UI Solutions.

    dx2

    The Business Solutions are project templates that create Word and Outlook applications with main windows that are modeled after Microsoft Word and Outlook, each very functional. Here is a screen shot of the Word style application running with no extra code added:

    dx3

    There is a full ribbon control filled with controls that manipulate the rich text editor. Everything I tried works as expected.

    The ‘New Item’ Template Gallery window provides the following list of item templates to select:

    • WPF Common
      • DXWindow
      • DXRibbonWindow
      • DXSplashScreen
      • UserControl
    • WPF Views for MVVM
      • Tabbed MDI View
      • Business Object View
      • Collection View
    • WPF View Models for MVVM
      • Blank View Model
      • Business Object View Model
      • Collection View Model
    • WPF Data Models for MVVM
      • Entity Framework Data Model

    Each of the item templates has its own wizard to assist in binding to existing or new data sources. MVVM out-of-the-box… nice. Hopefully, we will have the same kinds of choices built into Visual Studio’s New Item dialog soon.

    Windows UI Style Controls

    Selecting the Tile Application project from the DevExpress Template Gallery will create a WPF project that looks like a Windows UI Style app. Run the project for the first time and here is what you will see:

    image

    It is a full-screen WPF desktop application with no close button or other window chrome. If you didn’t alt-tab back to Visual Studio and see the application’s icon in the Windows Desktop taskbar, it would be hard to tell the difference. The Windows 8 look-and-feel is provided by the DevExpress TileLayoutControl and groups of TileControls.

    This is an MVVM application with two views (in addition to MainWindow.xaml), two view models and a sample data source used as the model.

    image

    Touch-Enabled Theme

    A new theme called TouchlineDark was added to support touch screen PCs and tablets. By changing the dx:ThemeManager.ThemeName to TouchlineDark in MainWindow.xaml from the previous section, the whole app switches to the new theme.

    image

    By default, DevExpress WPF controls styled with this theme will be larger and more touch-friendly, as can many of the standard WPF controls from Microsoft. Here’s a shot of the DevExpress WPF Data Grid using TouchlineDark I found in the online documentation.

    HelpResource

    Summary

    As you can see, the WPF Subscription from DevExpress has everything a developer could ask for to create great-looking line-of-business (LOB) or Windows UI Style applications in as little time as possible. With advanced support for MVVM, data binding, theming and simple but powerful controls, the suite will be an integral part of my developer toolbelt for my next WPF project.

    Happy coding!


    Disclosure of Material Connection: I received one or more of the products or services mentioned above for free in the hope that I would mention it on my blog. Regardless, I only recommend products or services I use personally and believe my readers will enjoy. I am disclosing this in accordance with the Federal Trade Commission’s 16 CFR, Part 255: “Guides Concerning the Use of Endorsements and Testimonials in Advertising.


    The Dew Review – Infragistics NetAdvantage for WPF v2013.1

    Background

    I have been using controls from Infragistics (and previously Sheridan) for nearly fourteen years. I started using Sheridan’s controls for Visual Basic 6 back in late 1999 / early 2000 while developing the UI for a warehouse management system. Since that time, Sheridan has become Infragistics and I have used their WinForm and WPF NetAdvantage suites in several large projects in both the manufacturing and health care industries.

    The most recent version of NetAdvantage for WPF is 2013.1, just released in April. I recently had the opportunity to kick the tires on this release and wanted to share my thoughts.

    Installing the Tools

    Installing NetAdvantage for WPF is simple and painless, and a free trial of the suite can be downloaded online. You have the option of installing sample projects locally. Many WPF samples can also be test-driven live online. Both Visual Studio 2010 and 2012 are supported, as well as Expression Blend 4.0 and later. I have not tried using them with the Visual Studio 2013 beta, but I am sure they will work with that version as well.

    Once installed, the 80+ controls are all automatically added to your Visual Studio Toolbox window.

    toolbox1toolbox2

    toolbox3toolbox4

    As you can see, there are controls available for just about any scenario your business analysts can throw your way.

    Samples

    If you choose to install the sample projects, they can be found under an Infragistics folder in Public Documents.

    samples location

    There is a Showcase sample which is a C# project containing line-of-business samples including a Music Browser, a Stock Trader and a Customer Relationship Manager. This set of samples highlights some of the ways you can use the WPF controls together to build applications with a great user experience.

    There are also over 50 projects that highlight how to use individual controls and sets of controls in the NetAdvantage suite. These projects are all part of the Infragistics.Samples.WPF solution found in the CLR4.0 samples folder.

    wpf samples

    What’s New

    NetAdvantage 2013.1 has a number of new and updated features for WPF. Several of the data visualization controls have been enhanced, including the Gantt, Geographic Map and Data Chart. New controls include the Doughnut Chart (for visualizing percentages) and the Radial Gauge (in CTP version).

    13_1_donughtCharts

    The WPF Doughnut Chart control.

    The WPF Ribbon controls have been updated to include an Office 2010 style Application Menu, and their new Syntax Parsing Engine is now RTM. This framework enables developers to embed powerful code editing features into their own applications.

    My Impressions

    The applications I typically build focus more on user input and interaction than on data visualization. So, I tend to use controls like Dock Manager, Tab Control, Data Grid, Editors and Menus/Toolbars.

    One of the best things about using controls from Infragistics is the built-in theming support. In the included Showcase sample, switching between themes can be done with the click of a button, and the code behind those buttons is relatively straightforward. Each theme has resources in a corresponding xaml resource file. The theme selected has its file loaded into a ResourceDictionary, the existing MergedDictionaries collection is cleared and the new one loaded. Finally, the DataPresenter for the XamDataGrid control has its Theme property set to the name of the new theme. Here’s a snippet of that code:

    string path = "CustomerRelations/Resources/Themes/" + themeFile; 
    Uri uri = new Uri(path, UriKind.Relative); 
    ResourceDictionary rd = Application.LoadComponent(uri) as ResourceDictionary; 
      
    // Clear the MergedDictionaries collection 
    Resources.MergedDictionaries.Clear(); 
      
    // Add the new RD to the MergedDictionaries Collection 
    Resources.MergedDictionaries.Add(rd); 
      
    // Set Infragistics Theme for XamDataGrid 
    DataPresenter1.Theme = themeName;

    Any Infragistics WPF control derived from the DataPresenterBase class has a Theme property that can be set at runtime.

    I was anxious to try out the new Syntax Editor control, and I was pleasantly surprised how easy it was to get some pretty powerful functionality with almost no code.

    code editor

    I got line numbers, auto-indentation and C# syntax highlighting with only two lines of code.

    private void Window_Loaded(object sender, RoutedEventArgs e) 
    { 
        mainSyntaxEditor.Document = new Infragistics.Documents.TextDocument(); 
        mainSyntaxEditor.Document.Language = CSharpLanguage.Instance; 
    } 

    Support for C#, VB and SQL ship with the editor, but it can be extended to support other languages with custom grammar definition files.

    I am looking forward to spending more time with this amazing editor control.

    Wrap-Up

    Controls for Windows applications have come a long way since I started building software. User expectations have also evolved quite a bit. It’s no longer good enough to just build applications that are functional. They also need to look great. This focus on user experience understood by the team at Infragistics, and they keep pushing the bar higher with their controls. If you have a WPF project that needs a great UI, I suggest you take a look at the latest NetAdvantage suite for WPF. You will almost always end up saving money in the long run when you buy instead of build from scratch.


    Disclosure of Material Connection: I received one or more of the products or services mentioned above for free in the hope that I would mention it on my blog. Regardless, I only recommend products or services I use personally and believe my readers will enjoy. I am disclosing this in accordance with the Federal Trade Commission’s 16 CFR, Part 255: “Guides Concerning the Use of Endorsements and Testimonials in Advertising.

    del.icio.us Tags: ,,
    Mastodon
    github.com/alvinashcraft